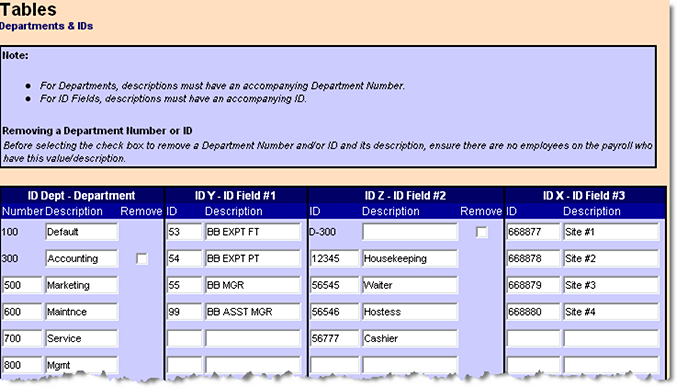
| Valid characters for department numbers and ID fields IDs are: |
| ID Dept: |
3 numbers (001 - 999) |
| ID Y: |
2 characters (alphabetical and/or numerical) |
| ID Z: |
5 characters (alphabetical and/or numerical) |
| ID X: |
6 characters (alphabetical and/or numerical) |
Tip: When you're finished entering your departments and/or ID fields, you have to click the Save button. If you don't, all your work will be lost as soon as you change screens. You'll know your work is saved when you see the DATA SAVED message on the screen.
Once you have created these IDs, they may then be used for Employee Profile and Employee Timesheet information.
a) For Employee Profile information:
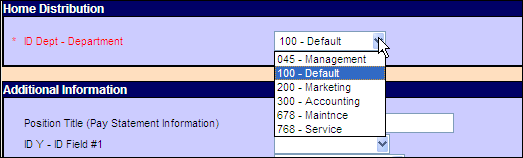
i) Select from the Payroll tab - Hire/Profile link - Home Distribution area - ID Dept - Department list.
Note:
The list that appears corresponds with the information you entered in the ID Dept - Department area of the Departments & IDs Table.
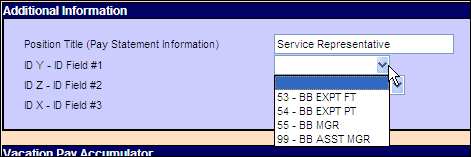
ii) Select from the Payroll tab - Hire/Profile link - Additional Information area - ID Y ID Field #X (X would be either 1, 2, or 3)
Note:
The list that appears corresponds with the information you entered in the ID Y - ID Field #X (X would be either 1, 2, or 3) of the Departments & IDs Table.
b) For Employee Timesheet information:
For Regular payments, select from the Payroll tab - Regular Payment link - Employee Timesheet link.
For Second payments, select from the Payroll tab - Second Payment link - Employee Timesheet - Second Payment link.
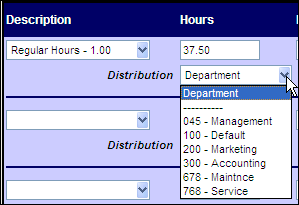
Select from the Distribution list of the Hours or Earnings area.
Note:
The list that appears corresponds with the information you entered in the ID Dept - Department area of the Departments & IDs Table.
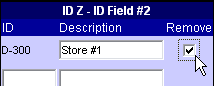
Deleting Departments and/or IDs
If you no longer require an existing department or ID:
- Navigate to the Departments & IDs page.
- To the right of the department or ID's description, click on the checkbox In the Remove column.
- Click the Save button.
|